Rebuilding my blog with Jekyll
There we go again. After Drupal, Grav and (managed) Ghost I wanted to try something new so I started exploring different Open Source flat-file CMS options. Drupal is very dear to my heart but I work 40 hours a week on it and certainly don’t want to manage the complexity of a database, modules, caching, reverse proxy, etc. for my simple blog. I love Grav and Ghost very much for blogging needs but wanted to try something new. Oh, and also, managed Ghost is quite expensive and I can’t quite justify this.
I narrowed down my research to only a few different options all based on technological interest. And let’s be honest, to also be able to geek out in the weekends.
Pelican
This is a Python-based solution with support for reStructuredText, Markdown, or AsciiDoc. Since I mostly write about technological topics anyway, I found interesting the idea to be able to leverage reStructuredText as I’m a big fan of Sphinx-based technical documentation (if not you probably should!).
And so I played with Pelican a little and liked the overall simplicity but couldn’t really find themes I liked enough, would work well out of the box or would meet my simple requirements (responsive, Disqus and Google Analytics support among other things). Nothing to really put me off, but I just felt I had to look elsewhere.
Lektor
Another Python-based solution used by a colleague who’s really vocal about it, so I gave it a try. If I’m to believe its Github stars it’s more popular than Pelican. While it does more things, I didn’t feel I wanted to get into that extra level of complexity, because I have the smallest needs here. But it definitely is a tool I’d like to check out again sometimes as it has a nicely polished UI and gives you the insanely cool possibility to create custom models/fields, which, for the drupalist in me, is a key argument.
Jekyll
I really didn’t want to look into Jekyll as I wasn’t impressed by it when I last tried it on Github pages. Turns out, it’s (very) popular for a reason. The documentation is really good and there are a number of plugins to do pretty much everything you need. But more importantly, there are plenty of resources available in various blogs. It always comes down to the community, right? Getting started is fairly easy granted you know where to look, which is everything but obvious and goes into much more details the Quickstart guide can possibly help with.
I won’t lie to you. Getting up and running with normal blogging requirements is hard because you’ll spend an awful lot of time reading the docs, random blog posts and trying out various solutions. Hopefully the below feedback from the trenches will help ease the pain. This post is by no means an endorsement of Jekyll. It’s merely an attempt at helping others understand more of it since it’s so popular.
Installation on Linux
I managed to get everything working on Debian 9 ‘Stretch’ with the below:
$ sudo apt-get install ruby-full build-essential
$ sudo gem install jekyll bundler jekyll-sitemap jekyll-tagging jekyll-paginate-v2 jekyll-algolia
Note that gems prefixed with jekyll- are optional plugins I’ll discuss below. If your plan is to host your site on Github pages, then keep in mind not all plugins are supported.
_config.yml
I immediately understood _config.yml was the file I needed to edit to get started. But at first I didn’t understand how powerful it actually is. You can store random information about the blog, but also extend Jekyll with a custom permalinks structure, header pages (main menu items), Disqus and Google Analytics information, plugin configuration (e.g. pagination, tags…), social network information, etc. More on that below. In this post I’ll often discuss modifications needed in _config.yml. Keep in mind every time you’ll make a change to _config.yml you’ll have to restart the server.
To serve pages and get access to the default content, we need to start the server. The Quickstart guide gives us everything we need. Note bundle exec jekyll serve --future --livereload allows to automatically a) include posts with a future date and b) reload the page in real-time with any modification. Definitely helpful when writing some content. Speaking of which, all HTML files are being automatically generated under _site. Nothing out of the extraordinary. Every solution I tried over the years does something similar, so I expected this.
Permalinks
By default, Jekyll creates URL slugs with the form category1/category2/YYYY/MM/DD/{title}.html. To understand how those are being generated I initially looked into _config.yml and then had to dive into YAML Front Matter. Here’s an example with the ‘Welcome to Jekyll’ post which lives under _posts/2018-03-24-welcome-to-jekyll.markdown
title:  "Welcome to Jekyll!"
date:   2018-03-24 13:18:41 +0100
categories: jekyll update
So, m’kay. Categories are being added to the URL slug if present. Removing them does indeed update the slug accordingly, but it’s not scalable. What if I do need categories? Upon removing the date line from the post, nothing happened. I did notice the post file was being prefixed with the date. When I removed it, the post vanished altogether. Ouch. So, removing categories from the YAML Front Matter works but the date doesn’t and it’s required in the markdown file to show up on the site. What about the .html extension? Do I have to resort to writing a .htaccess redirect? If so, where should I put the file?
Phew, at this point I even wondered why I should bother and go back to Pelican or Lektor which both make the barrier to entry much lower. But by sticking to it I finally understood that _config.yml can help, and permalinks are configurable. Aha! What I needed to only display the post title was the permalink: /:title/ line in my config file.
I would have appreciated it if I would have had code commented out to explain what it’s all about and what I can do with it. After all, this is a very common use case for bloggers. Anyhow, with this one-liner I could solve three problems: no categories, no date, and no .html extension in slugs. Neat. The prefixing date in markdown files is required, though. So is the title of the file that is going to directly influence the URL alias on the site. As an example, the file 2018-01-01-hello-world.md would render as https://site.tld/hello-world. Note I’ve added the .md suffix which works equally well as having .markdown. Jekyll understands both.
Theme
Contrary to other static file generators I tried this time, Jekyll comes with a clean default theme that is enough for my needs. I got super confused with modifying it though. No theme folder, no CSS folder, nothing. What the heck am I supposed to do here? After searching for quite some time I finally found you can override Liquid-based theme files directly in your project root. The process is as follows.
First, you need to find out the name of the theme currently in use. In _config.yml you should see a line theme: minima (or whichever other theme name defined here). This is it. Now type bundle show minima. On Linux it returned /var/lib/gems/2.3.0/gems/minima-2.4.0 for me. Not…obvious. Fortunately, what you need is there:
$ ls /var/lib/gems/2.3.0/gems/minima-2.4.0
assets  _includes  _layouts  LICENSE.txt  README.md  _sass
Now, if you want to override any CSS or HTML file, just make sure to place your override in the project root, not only in the expected location but also with the same name. Jekyll will then pick it up immediately. Lots of frustration to get to this point, though.
Highlighting
This one was quite obvious as I knew Jekyll was based on Pygments and the default content comes with the below ready-to-use highlighted code:
def print_hi(name)
  puts "Hi, #{name}"
end
print_hi('Tom')
#=> prints 'Hi, Tom' to STDOUT.
Which, in code, looks like this:
{% raw %}{% highlight <language> %}{% endraw %}
{% raw %}<your-code-here>{% endraw %}
{% raw %}{% endhighlight %}{% endraw %}
One final note on this. To be able to render raw Liquid tags as above, you’ll have to surround your code with {% raw %}{% raw %}{% endraw %} and {% raw %}{ % endraw %}{% endraw %} for each line you don’t want to be processed.
Images
Initially I found the below code snippet that worked great locally but didn’t work with the remote domain name.
{% raw %}![Asset description](){% endraw %}As I didn’t want to spend ages on this or go fancy, I chose to stick with the raw Markdown notation I’m already used to. It goes with the form:
Even though I don’t have a whole lot of images I like to a) organize them in a yearly hierarchy, and b) prefix them all with the corresponding date of the post they’re a part of. You never know when you’re gonna need that information at some point in time, right?
Tags
We discussed categories earlier in this post, but what I’m really interested in are actually tags. The official doc says:
Similar to categories, one or multiple tags can be added to a post. Also like categories, tags can be specified as a YAML list or a space-separated string.
What this means is you can have two different forms. The easy way:
tags: tag1, tag2, tag3Or the more advanced way (YAML list), which proves to be mandatory if you have space-separated tags.
tags: [tag1, tag2, tag3 is awesome]Note you could also write the above like this:
tags:
  - tag1
  - tag2
  - tag3 is awesome
Creating tag pages
With that done, let’s get into the more complex bit: displaying tags on the homepage and posts. You’d think it comes by default but it doesn’t. I found this blog post which helped, but then I stumbed upon the jekyll-tagging plugin which makes this a breeze and also creates tag pages. Sit tight. It might seem a bit complex at first, but it worth it.
To activate the plugin, edit _plugins/ext.rb and add require 'jekyll/tagging'. In _config.yml we now have to define the layout used to generate tag pages. Here’s my configuration:
tag_page_layout: tag_page
tag_page_dir: tag
tag_feed_layout: tag_feed
tag_feed_dir: tag
tag_permalink_style: pretty
I’m not making this up! Just read the plugin page. The default configuration is ready to go. Same with the tag page layout. Just create a tag_page.html and tag_feed.xml files under _layouts and copy over the default content as found on the Github repo. I wanted to go with something dead simple so I did the following for the tag_page.html file to have an unordered list of posts prefixed with the date they were published:
{% raw %}---{% endraw %}
{% raw %}layout: default{% endraw %}
{% raw %}---{% endraw %}
{% raw %}<h2></h2>{% endraw %}
{% raw %}<ul>{% endraw %}
{% raw %}{% for post in page.posts %}{% endraw %}
{% raw %}  <li>: <a href=""></a></li>{% endraw %}
{% raw %}{% endfor %}{% endraw %}
{% raw %}</ul>{% endraw %}
Ok. Now visit the /tag page. See all tags listed here? This means everything works as expected. Now click on any tag or visit /tag/<your-tag> and notice the formatting we’ve just applied to tag_page.html has kicked in. It all starts to make sense, doesn’t it?
Displaying tags on the homepage and posts
We now have our tag pages and related configuration. But what if we want to list tags on the homepage and posts? Well, you know how to override your theme files by now, so just override home.html and post.html by copying them from your theme location to your _layouts directory. Then, it simply is a matter of adding the {% raw %}{% endraw %} code block for home.html and {% raw %}{% endraw %} for post.html where you see fit.
The result is it will display all tags for a given post and will even make them clickable such as you get to the relevant tag page. See below.
 Jekyll tagging example
Pagination
You’d think this one would also be included by default, but it’s not! After reading contradictory stuff here and there, I stumbled upon the jekyll-paginate-v2 plugin. There are even examples on how to implement it. At the time of this writing the README file was pretty outdated so look at the code directly.
In the install section above, we installed the plugin already. Now we need to enable it. In your Gemfile, add the gem "jekyll-paginate-v2", "~> 1.7" line in the main loop such as below:
group :jekyll_plugins do
  gem "jekyll-paginate-v2", "~> 1.7"
  gem "jekyll-feed", "~> 0.6"
end
Copy over the recommended default configuration and add it to _config.yml. I’ve slightly tweaked it to best suit my needs.
pagination:
  enabled: true
  per_page: 5
  permalink: '/page/:num/'
  limit: 0
  sort_field: 'date'
  sort_reverse: true
Then, replace {% raw %}{%- for post in site.posts -%}{% endraw %} by {% raw %}{% for post in paginator.posts %}{% endraw %} in home.html, and add the pagination links at the bottom of the file, too. Here’s the code I’m using:
<!-- Pager buttons -->
{% raw %}{% if paginator.total_pages > 1 %}{% endraw %}
<ul class="pager">
{% raw %}{% if paginator.previous_page %}{% endraw %}
<li class="previous">
<a href="">← Newer Posts</a>
</li>
{% raw %}{% endif %}{% endraw %}
{% raw %}{% if paginator.next_page %}
<li class="next">
<a href="">Older Posts →</a>
</li>
{% raw %}{% endif %}{% endraw %}
</ul>
{% raw %}{% endif %}{% endraw %}Finally, in index.md’s YAML Front Matter, you’ll have to enable the pagination and you should be all set.
pagination:
  enabled: true
This eventually renders as:
 Jekyll pagination links
Social networks and RSS
With the minima default theme, it’s easy to configure social networks and RSS directly in the footer. Edit _config.yml and update the information that is relevant for your needs. I simply entered:
twitter_username: your_twitter_username
github_username:  your_github_username
linkedin_username: your_linkedin_username
rss: rss
Note that rss: rss will actually link to feed.xml.
Disqus
In _config.yml, add the below code and replace the shortname by yours.
disqus:
    shortname: your_disqus_shortname
I found this blog post to be really helpful. Essentially, what’s required from you here is to create a disqus_comments.html file in your _includes directory with the below code:
{% raw %}{% if page.comments != false and jekyll.environment == "production" %}{% endraw %}
  <div id="disqus_thread"></div>
  <script>
    var disqus_config = function () {
      this.page.url = '{% raw %}{% endraw %}';
      this.page.identifier = '{% raw %}{% endraw %}';
    };

    (function() {
      var d = document, s = d.createElement('script');

      s.src = 'https://{% raw %}{% endraw %}.disqus.com/embed.js';

      s.setAttribute('data-timestamp', +new Date());
      (d.head || d.body).appendChild(s);
    })();
  </script>
  <noscript>Please enable JavaScript to view the <a href="https://disqus.com/?ref_noscript" rel="nofollow">comments powered by Disqus.</a></noscript>
{% raw %}{%- endif -%}{% endraw %}
You can see the code is smart enough to replace {% raw %}{% endraw %} by the Disqus shortname added in _config.yml and {% raw %}{% endraw %} by the url value, also in _config.yml.
To make sure Disqus comments will show up on the site, there’s one remaining step. Add the below code in your post.html file.
{% raw %}{%- if site.disqus.shortname -%}{% endraw %}
  {% raw %}{%- include disqus_comments.html -%}{% endraw %}
{% raw %}{%- endif -%}{% endraw %}
Disqus integration
Et voilà!
Before we move on, did you notice the jekyll.environment == "production" bit at the beginning of the disqus_comments.html code block? It’s there to indicate whether Jekyll is being run on a production environment or not. Before you push to prod, just make sure to run the following command: JEKYLL_ENV=production jekyll build. This will make it so both Disqus comments (and your Google Analytics code FWIW) will only be run against a production instance only.
Sitemap
Above, you’ve probably noticed I installed the jekyll-sitemap gem. The configuration is very simple.
Add gem 'jekyll-sitemap' to your site’s Gemfile and run bundle to reload all Ruby plugins. Next up, make sure to have the below configuration in your site’s _config.yml:
plugins:
  - jekyll-sitemap
If everything went well, you should see your XML-generated sitemap at /sitemap.xml.
Search
I really like searching on the Hacker News website. Search is powered by Algolia, which is extremely fast and nifty. Especially the instant search feature with the highlighting goodness.
So I checked if integrating Algolia with Jekyll would work and it does! Earlier we installed the jekyll-algolia gem. Now we want to make it work with our site. You can refer to this tutorial for a more detailed description of the implementation.
Backend
First, we need to install the plugin into our Gemfile’s :jekyll_plugins section which now resembles this:
group :jekyll_plugins do
  gem "jekyll-paginate-v2", "~> 1.7"
  gem 'jekyll-algolia', '~> 1.0'
  gem "jekyll-feed", "~> 0.6"
end
From within your project repository, make sure to run bundle install to install the dependencies and get the lockfile updated.
To confirm Jekyll is now aware of your newly installed gem, just type:
$ jekyll help | grep algolia
  algolia               Push your content to an Algolia index
Next up, we need to update _config.yml with Algolia’s recommended configuration:
algolia:
  application_id: your_app_id
  index_name: your_index_name
  search_only_api_key: your_search_only_api_key
  indexing_batch_size: 500
  extensions_to_index:
    - md
application_id and index_name are there to populate the index, and search_only_api_key for querying it. Optionally adding an indexing_batch_size and extensions_to_index is really up to you and the level of granularity you want to get into.
At this point we can try and index our content with ALGOLIA_API_KEY='your_admin_api_key' bundle exec jekyll algolia. If you run into errors, check the issue queue for the module. Chances are errors might be related to your dataset being too large to index (there’s a 10kb max size for entries)
Frontend
Before we can search for our indexed content, we need to build the presentation layer. Create _layouts/algolia.html and populate it with the following:
<!-- Including InstantSearch.js library and styling -->
<script src="https://cdn.jsdelivr.net/npm/instantsearch.js@2.6.0/dist/instantsearch.min.js"></script>
<link rel="stylesheet" type="text/css" href="https://cdn.jsdelivr.net/npm/instantsearch.js@2.6.0/dist/instantsearch.min.css">
<link rel="stylesheet" type="text/css" href="https://cdn.jsdelivr.net/npm/instantsearch.js@2.6.0/dist/instantsearch-theme-algolia.min.css">

<script>
// Instanciating InstantSearch.js with Algolia credentials
const search = instantsearch({
  appId: '{% raw %}{% endraw %}',
  indexName: '{% raw %}{% endraw %}',
  apiKey: '{% raw %}{% endraw %}'
});

// Adding searchbar and results widgets
search.addWidget(
  instantsearch.widgets.searchBox({
    container: '#search-searchbar',
    placeholder: 'Search into posts...',
    poweredBy: true // This is required if you're on the free Community plan
  })
);
search.addWidget(
  instantsearch.widgets.hits({
    container: '#search-hits'
  })
);

// Starting the search
search.start();
</script>
This is Algolia’s most straight forward implementation based on InstantSearch.js.
The last bit is now to update home.html (copy this file) to make the search bar show up. At this point I had to step back a little because what this does is it’ll mess up with the pagination we’ve set up earlier…and make you wonder why actually bother with paginating through any number of blog posts when you can instantly search any string as if you were performing a web search.
And so I went ahead and decided to follow this path, which now gives the following:
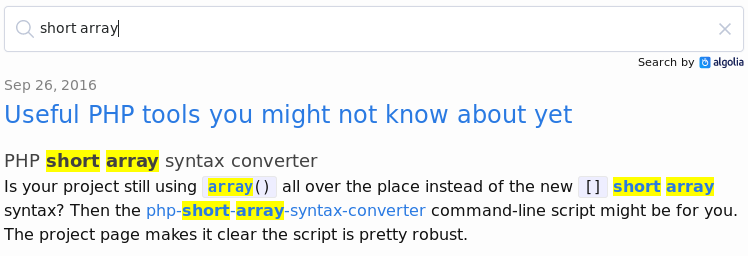 Algolia InstantSearch implementation
Automated deployment
I’ve been trying to think about how to easily deploy changes on the server. I wondered whether Git hooks would be a good fit here, but since no post-push hook exists and I don’t necessarily want to couple code deploys with Git push anyway, I went with a different solution. I’m already using Ansible to manage the server configuration, so I figured I could also use it for code deploys and keep everything under a unified repo.
In .bash_aliases, I’ve added the below function.
blog() {
  REPO="/path/to/jekyll/repo"
  PLAYBOOKS="/path/to/playbooks/repo"

  cd "${REPO}" && JEKYLL_ENV=production jekyll build
  ansible-playbook -i "${PLAYBOOKS}/hosts" "${PLAYBOOKS}/deploy.yml"
}
Doing so allows me to ensure the build will be production ready (with the JEKYLL_ENV flag) before pushing to the remote server. Additionally, the deployment playbook gives me peace of mind by backing up the code on the server first and deploy (via Ansible’s synchronize module) the new code. Nothing spectacular here. You could very well achieve this by rsync’ing Jekyll’s _site content.
Wrapping up
If I had known how much work was required to get up and running with Jekyll I’d definitely have invested more time in either Pelican or Lektor. But that’s how it is and I’m happy with the result and also the options I have at my disposal to make it even more flexible going forward. And trust me, there are many, especially for SEO and social sharing needs.